Wednesday 30 December 2015

Decided that I should be bold today and fit the boot floor and weld it up:

Trial fitting the main floor panel.


Main panel tacked on and the corner sections and rear chassis legs in place.


All welded in, I have a boot (trunk for those on the other side of the bid pond).


Wednesday 23 December 2015

Two days before Christmas which is always exciting and I have a day of garage action.  I started by pressing the bushes into the chassis on the near side to finish that job.

I then turn my attention to the front suspension because I want to return the complete units to storage at my Mother-in Laws house and free up some space.  I actually drove them round there last week along with the petrol tank but decided against dropping them off because I need to keep hold of the shock absorber.  It occurred to me that I need the shock to ensure that the inner wing doesn't obstruct its movement and mounting the inner wings is rapidly becoming a job I need to do.  I detached the shock from the front suspension by removing the bolt that holds it to the top of the king pin assembly.  Naturally I killed the bolt in the process.


I was about to load the wishbone/king pin assembly back into the car for transportation when I noticed the two bolts that hold the wishbone into the chassis.  Having spent hours sanding / polishing the chassis mounts for the rear leaf springs I realised that I would need to ensure that these fit into the front mounting apertures post galvanising.  So I removed them from the wishbones and cleaned them up.


Having done that I dropped off the front suspension units and brake drums that I worked on a month or so to the In-Laws for storage.  When I returned I had a package from Ahead 4 Healeys containing the shackles and pins.  I knew instantly that they had sent what I thought was the outer shackle when I needed the inner, damn.  I gave them a call and discovered that they had started their Christmas holiday an hour earlier and wouldn't be back until I was safely back at school, oh well.  I was pleased to get the lower shackle pin though as it meant I could see if the bushes were properly aligned.  I greased the bushes and eased the pins in, success.  The near side pin feels perfect, the off side pin is very tight, there is the correct movement but boy is it stiff.  If the car was being used now I wouldn't be troubled by it as I am sure it would settle in nicely.  But as it will be years before the car is used I will have to make sure that it settles in correctly as I wouldn't want to have to change the pin or the bushes.


If you look at the two vertical marks on the chassis in the picture above this shows the place where the rear chassis member that holds the bumper mounts.  Directly alongside that sits the boot box section.  This section also runs along the rear edge of the chassis meaning that the whole area is extremely difficult to get to.  Perish the thought of replacing those bushes on a complete car.

Monday 21 December 2015

I then set about sorting out the chassis suspension mount including the angle of the dangle of the grease nipple.  I started by welding the existing hole and then drilling and taping a new thread.  I decided to do this rather than bend the grease nipple as that seemed very short sighted.


Once done I am instantly relieved that I did it this way, it looks loads better.


Finally I finished sanding the inside of the chassis suspension mount and then pressed in the metal bushes.  It looks good now that it is completed.  I found out that the metal bushes are used to ensure that the leaf spring stays in correct line with the chassis.  Makes sense.


I looked on the Ahead 4 Healey's web site and discovered that the shackles that I was thinking of replacing are about £50 for the set and that seemed awfully big.  I decided to find the second pair of shackles to see if they were salvageable. Below is the original frame in storage outside the back of my house.


When I look at the rear end I see that one of the petrol tank straps is still useable.


When I delve in I was please to discover that the chassis still had the shackles.


So I got two of my favourite tools out and removed it.  Great fun.

The chassis looks a little violated but what can one do?


I cleaned up the shackles and decided that the inner two were too warn so I ordered replacements for those two and saved the good two.  Better than a kick in the teeth I guess.


Sunday 20 December 2015

The Christmas holidays are here, a great time to be a teacher.  Over the past few weeks I have finished getting the boot floor to fit correctly, de-rusted it and painted it in the usual weld-thru primer. Today it was sufficiently dry to enable me to get the car out and fit the front near side wing back on.  I am a little perplexed by the door gaps which are all different again.  I am going to have fun when I eventually get round to fitting them for the final time once painted.  Anyway, I am comfortable that the floor doesn't distort the back end any so will weld it up in the next few days.  I know I have shown these before but it really is starting to look like a car:


I then got round to trying to fit the metal bushes that the rear leaf spring mounts on to.  It is a bit of an odd one; solid metal with grooves cut into the inner surface for grease to lubricate.  Not sure why they didn't use rubber bushes like they have elsewhere.  Anyway, they don't fit.  I think this is mainly due to the zinc plating and so I got the Dremel out and started to sand the internal aperture.  They almost fit now but I suspect that they need to be a tight fit to avoid any play so I will investigate and sand further later on if needed.

I then took the original section apart to see if I can re-use any of the original parts, don't think I can really.  One of the link arms is ok but the other is worn severely so it makes sense to replace them as a pair.  Note the bushes in the photo below; the original items are fused to the chassis .  Note also the new grease nipple which extends downwards.  If you look at the bottom photo you can see that the holes have been drilled at the wrong angle, flippineck!  I have  choice, I can weld up the holes in the chassis for the grease nipple and drill and tap a new one at a better angle or I can fit the grease nipple and bend it down.  Will think on that over night.


Monday 30 November 2015

Sunday came and so did the rain which meant I couldn't get the car out to look at the lines again which is probably just as well.  I visited my in-laws and retrieved the boot and the petrol tank.  I was somewhat surprised that the tank fitted first time, most odd.

The boot lid sat in the aperture that it is supposed to but it hardly looked good.


I had a little play with it and ended up with it looking much better.


The shape of the boot quite surprised me in that it is far more bulbous that I had given it credit for.  The boot frame came away from the lid and this made it easier to bend about.


Saturday 28 November 2015

Saturday = garage time again, result.  I spent the morning changing the rear brake pads on the daily run around.  I bought the pads in June and went to fit them only to discover that I needed a brake piston rewind tool.  We travelled to the south of France and back after that but only got round to getting a rewind tool this week.  I'm not sure why it took me so long as it was only £8 on eBay, £8, that is amazing.  Anyway, it always feels good when I do something on the car as so much of the thing is controlled by electronics.  Job done then the rain came in so I got dry and took a look at the 100.

I started by fitting the freshly painted rear wings and then worked on the boot floor.


It required quite a lot of cutting and shutting and eventually sat in place.  I was happy that the floor sat centrally in the cavity it occupied but the next photo highlights that it isn't exactly square.  The worrying thing is that the door gaps on the left are bigger than the door gaps on the right so it makes me worry about total body alignment again.  I'll hopefully get the car out tomorrow and fit the front wing before having a good look at the whole car, gaps and all.  I might get the petrol tank and boot lid back from my in-laws to see how they fit before I go too.  Anyway, feels like progress again.


Sunday 22 November 2015

So I took the two rear wings that I sandblasted yeaterday and checked them for holes........  you guessed it, there were loads.  I spent the earliest hours of the this fine and sunny November Sunday morning welding and grinding the wings.  When done I dried, degreased and doubt checked each panel before painting them.  I dd the ouster side of the wings in regular zinc rich weld through primer and the inner wing in two coasts of POR15.


I watched Spurs beat West Hame 4-1 in the middle of this and consumed a few pints of Stella in the process.

the wings after sandblasting but before at the action begins.


Add caption


Saturday 21 November 2015

Amazingly the wind did drop so I got the sandblaster out and attacked the two rear wings.  It was great fun and I happily burnt through 4 bags of sand.  I have collected about 3 bags of the used sand though but I need to sieve it before I can reuse it.


The wings are now ready for hole checking and painting.  It isn't obvious that there are holes unlike with the front wing but I suspect that there might be some all the same.


Last weekend I turned the car round having finished the near side and removed the wings so I was ready to get going on the finishing touches of the off side today.  I knew that the car was largely finished on this side apart from the inner sit which needed modifying to allow the aluminium trim to fit.  I was pleased with the door gap and lines of the bodywork so set about the sill.  As with the other side I was able to cut the welds and lower the top of the sill and create enough space for the trim panel.  below you can see where the sill had been lowered, a good 1cm plus.  Alls well though so I headed in for some lunch.


Back from lunch I decided to start welding the door area up.  The job I wanted to do was sand blast the wings but it was way too windy outside so I welded instead.  It was fun.


I didn't realise this was so out of focus but wanted to show the edge of the door shut panel and the inner wing which I tried and welded up, very satisfying.

I then ground down the mess I had made and painted it with primer to seal it from the elements.  You can see that the front edge is now welded and cleaned up too.


Friday 20 November 2015


Having finished the axel I turned my attention to new toys and the fact that in England in the middle of November it was not raining.  I decided to use my new sandblaster and get the front wing ready for primer.  It wasn't ready, by  a long shot.  I spent a long time discovering (creating?) holes and welding then up again.  The blaster made a lot of holes, it was a long cycle.  

Once done I painted the wing.


Whilst looking at another web site I realised that one could see the inside of the front wing  when looking at the engine bay, umm. 


Finally got all the bits I needed to finish the axel.  Well I didn't get the shims for the diff but I have located some (thank you John, once again).  I started by fitting the diff back into the axel housing and then the half shafts.  I decided to use a gasket sealer along with the new gaskets having canvassed many opinions.  Once done I fitted the other components to the brakes and the drums themselves.


The service manual drew my attention to fact that the wheel cylinders are supposed to slide in the grooves cut out of the backing plate meaning that the plain nuts I used would work loose.  I need some nylock nuts for the job.


Having finished the brakes and the diff I turned my attention to the external components housed on the axel.  I fitted the handbrake rods and pivot leaver and realised that I don't have any split pins, how can I not have any of those?  I suspect I have and that they are stored in a very logical and sensible place that I have forgotten all about!

Then I got out my brake pipe flaring machine to make the pipes, a job I always love for some reason.  I got the brake pipe flaring tool from the place that my father used to work at.  When I was a whipper snapper I worked at his yard for a year before university and again for a year after it.  I learnt much of what I know now at that time.  My father
 did bodywork and a mechanic, a chap called Eric,  worked there taking care of all the stuff dad didn't want to get involved in.  Eric is an unusual man, well eccentric really, and a man who I grew really fond of.  He had a way of knowing how to do lots of different jobs.  What is most disturbing about Eric though is what happened to his tools.  He used to live, literally,  in a section of the yard that consisted of a comfy arm chair, a bottled gas heater and all his tools.  I left the yard as a young early twenty something year old to make my fortune in sales about the same time I sold the MG Midget that I had all through University.  I had had my fill of old cars at that point and bought a newish but very exciting motorbike.  I got totally wrapped up in new and reliable bikes for about 10-15 years.   During that time my Dad retired from work and passed the yard on to a friend who worked there.  Eric left and essentially his tools got distributed.  The only thing I got was the brake pipe tool which is why I started this whole story.  The crying shame is that most of the tools were thrown away because nobody had a use for them.  Oh how I would love them now.  It is often said that youth is wasted on the young but I regularly kick myself for not making more of `Eric, his knowledge and of course his tools.

The completed axel (less the diff shims and the correct nuts for the wheel cylinders)


The axel wrapped in polythene and hidden away in storage for, most probably, too long.


Tuesday 10 November 2015

Things have taken a new shape in the challenge that they present.  I ordered a pair of shims for the differential that are required to create the correct pre-load for the bearings at the front of the unit.  They arrived with the rest of the axel parts order and I thought nothing more of it until I went to fit them at the weekend only to discover that they are the wrong size.  Not to worry I thought and sent them along with one of the originals back to AH4H.  I received an email today to say that they don't have stock of the parts I need.

Now this may sound glib or even idiotic but it never occurred to me that I wouldn't actually be able to find a part for the car off the shelf.  I realise that there are lots of parts that are sold as reconditioned by the major Healey suppliers but it never occurred to me that I would get caught out by it.  This is mainly because I have the key components with the car and the suppliers have catalogs that have lots and lots of pages of 100 BN1 parts for sale.  Body panels I could make.  Bearings, nuts and bolts are all widely available at the click of a button, and so on.  What could go wrong?  After a look at the main Healey suppliers and a google search it dawned on me that I am hunting a part that doesn't exist anymore and I feel a little stupid.

Falling back into my glib / cocky mode of operation I comfort myself by thinking that it will be alright, won't it?  You see that whilst these shims are important for setting pre-load and therefore the correct operation of a fundamental part of the drive train they are, well, just thin washers aren't they?  Surely I must be able to find somebody that can make two shims, surely?

Sunday 8 November 2015

It feels odd being in the garage at the moment as I am largely faffing about with bits of mechanical stuff that I haven't as yet touched.  On one hand it is really interesting to be doing different things and it is nicely challenging and interesting.  Yet on the other hand it has the potential to be largely frustrating.  I ordered all the bits I need to put the axel together and realised that I had missed a felt washer so was unable to do it.  I ordered this and Ahead 4 Healeys shipped it very quickly only to discover that the nut and bolt set I had bought a year or so ago didn't have the nuts required to fit the wheel cylinder.  I checked with two sources and then ordered BSF nuts from Mamrick only to get them and discover that they are UNF, arrggggghhhhhh.  I had also ordered a set of tap and die in Whitworth before realising that it should have been BSF and then to discover that it should have been UNF.  Basically I am doing a small fortune on nuts, bolts, taps and dies and my axel is still in bits.

Having said that though I am quite chilled about it.  I suspect that this is going to be the territory for the mechanics and if I get stressed then I am going to end up unhappy and that seems daft.

In between the stuff I mentioned above I renovated the brake drums and because I decided to use heat compliant paint from POR15 I got the front wishbones out of storage to renovate those drums to ensure the paint looked the same for the front and the back.


I have decided to leave the rest of the front suspension set up well alone for now as I am not sure what to do with regards to the king pin set up.


The drums look pretty funky though.


The solver bits flying around are the rear brake pad adjusters after a quick paint (for corrosion protection before the car is back together).


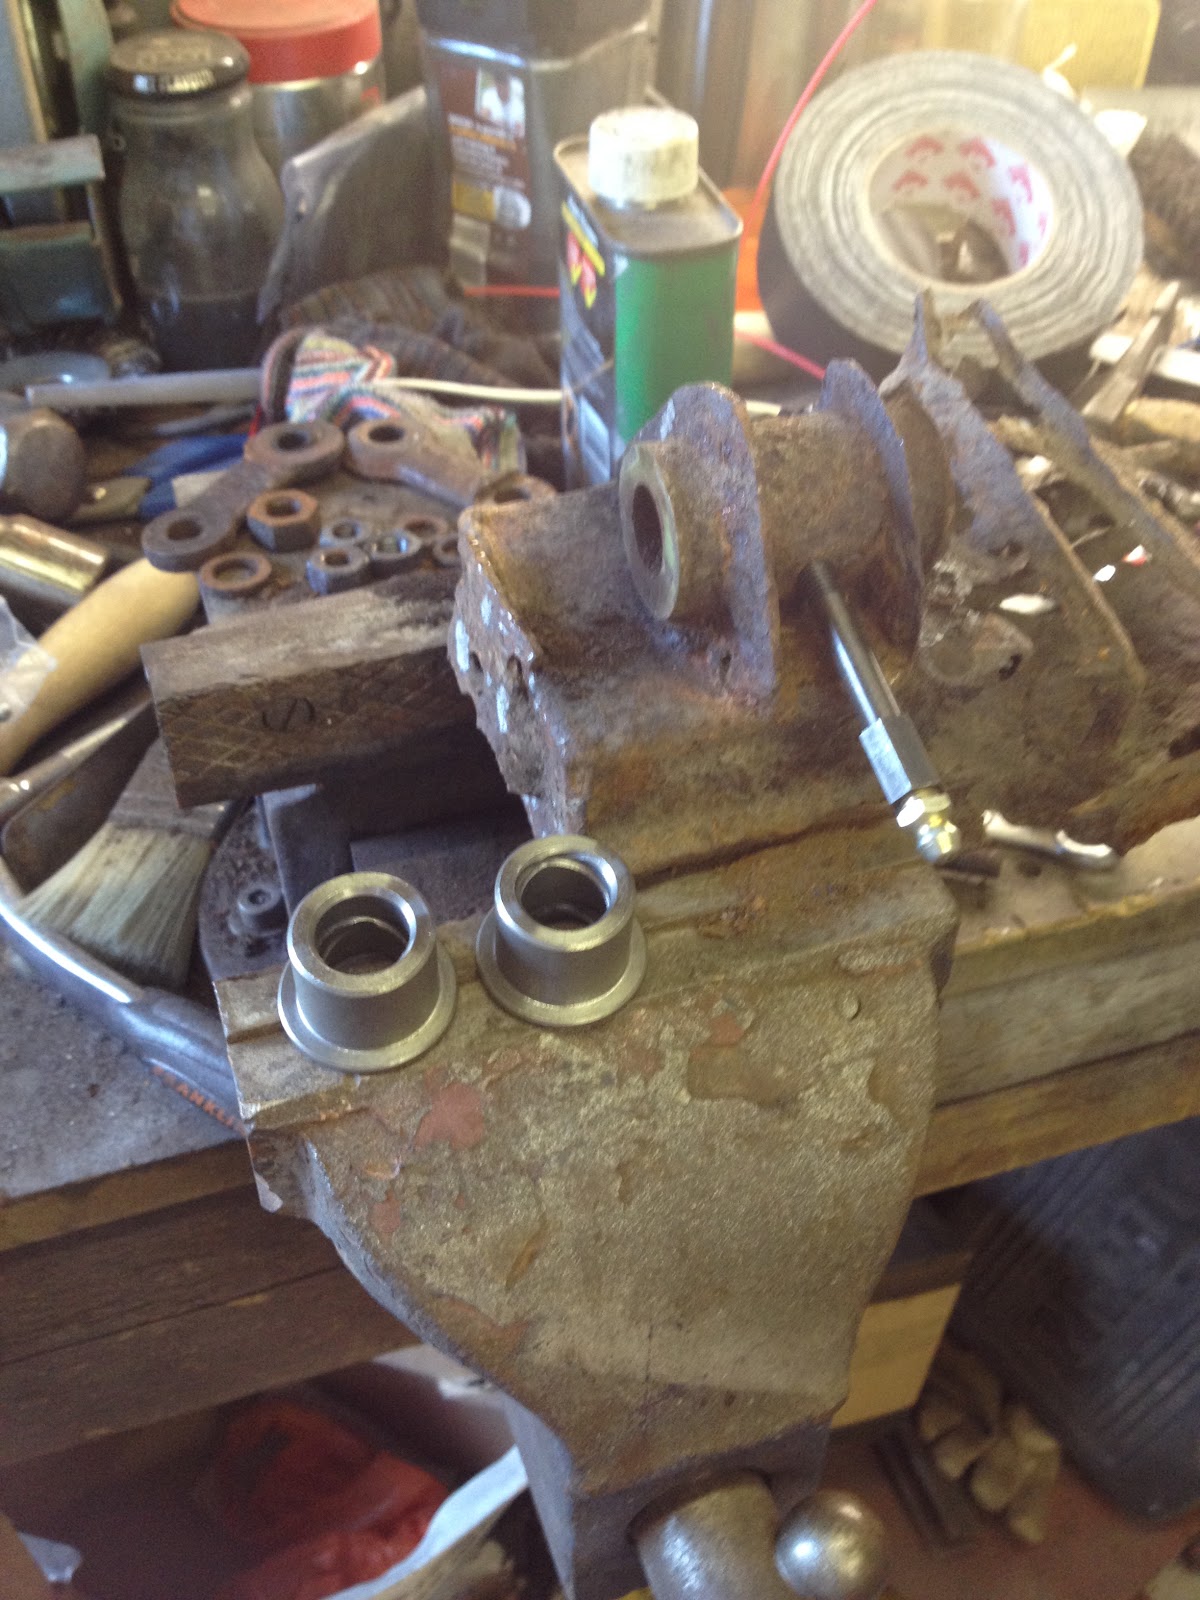
I sent this picture to AH4Healeys to check that I had the correct seal for the front of the differential.  They said that I had and that they were made in a more robust way back in the day.  I went to out the diff back together and realised that the shims I had were the wrong size, the diameter was very different, so another thing to go back and wait on, ho hum.

So having realised that I am waiting on the postman I returned to the front wing and did my final bits of panel beating. Trust me, this was just beating.  Anyway, the result was good so I took the wing off and outside for a sandblast prior to a de-rust session and then paint.  I eventually got the new sandblaster working well and was halfway through the job when it started raining.  Oh well.

Another issue is that I have discovered that the sand blasting gets fine grit/sand/dust everywhere and because I don't have anywhere to store stuff I have had to clean the diff out with a jet wash and loads of degreaser.  Even when I sandblast outside the garage still has a fine layer of dust all over it.  Must try harder....